
Is your iPhone acting strange, with sound only coming through headphones that aren’t even plugged in? This is a frustratingly common issue known as “stuck in headphone mode.” It can leave you unable to hear calls, play music, or watch videos without a pair of headphones, even after you’ve unplugged them.
At QuickFix, we’ve seen and fixed thousands of iPhone issues, and this is one we encounter often. While it might seem like a major problem, the good news is that it’s often caused by a simple issue you can fix yourself. We’ll walk you through the most common culprits and a series of troubleshooting steps to get your iPhone’s sound back to normal.
What Causes an iPhone to Get Stuck in Headphone Mode?
Before you start troubleshooting, it’s helpful to understand what might be causing the problem. The most frequent cause is your iPhone mistakenly thinking that headphones are still plugged into the lightning port or headphone jack (on older models). This can happen for a few key reasons:
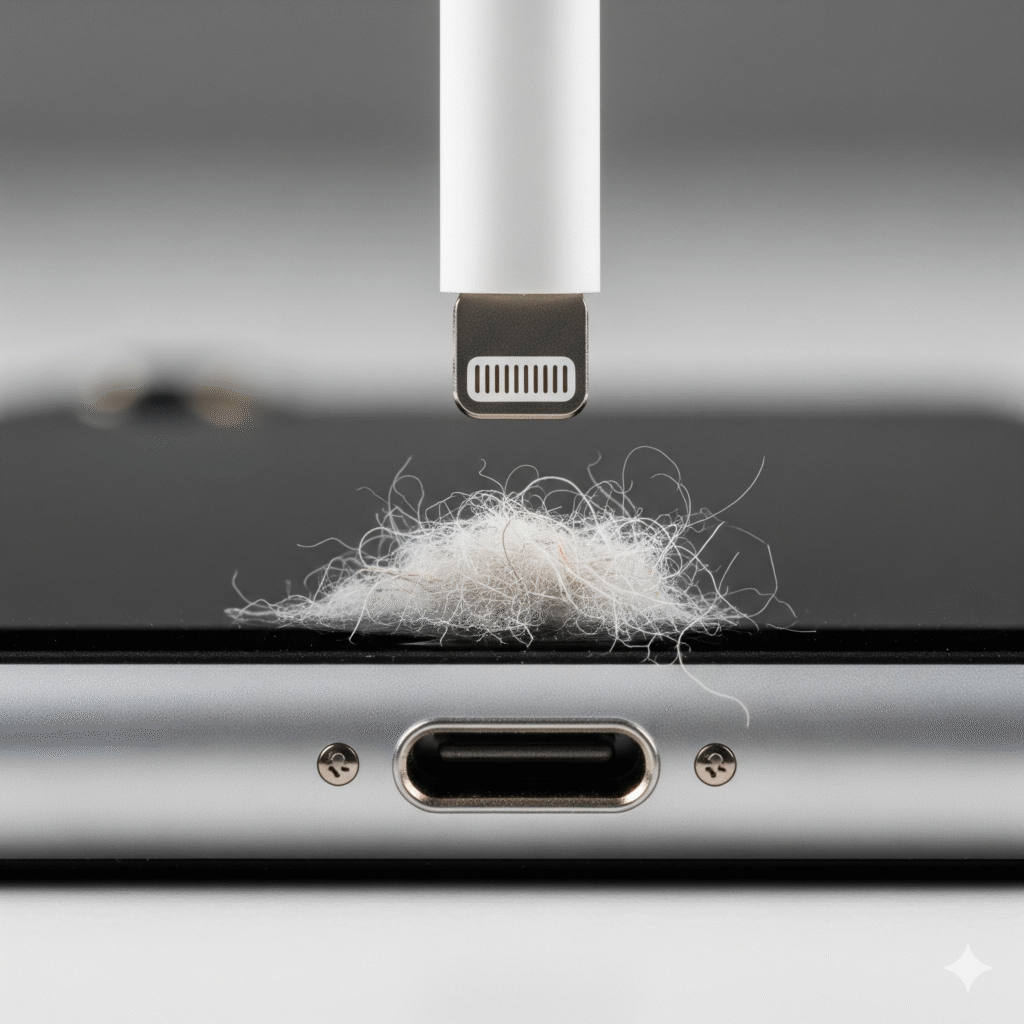
- Debris or Lint in the Port: The most common culprit is a buildup of pocket lint, dust, or other debris in the charging port. This gunk can create a physical blockage that prevents the internal sensor from recognizing that the headphones have been unplugged.
- Moisture or Liquid Damage: Even a small amount of moisture, from a spilled drink, rain, or a humid environment, can trick the internal sensors into thinking a connection is still active.
- Software Glitch: Sometimes, the problem isn’t physical at all. A minor software bug can cause the iPhone’s operating system to get confused and mistakenly remain in headphone mode. This can happen after an app crash, a failed update, or simply a temporary system error.
- Damaged Port or Connector: In rare cases, the lightning port or headphone jack itself might be physically damaged. A bent pin or a loose connection can cause a constant “headphone connected” signal to be sent to the phone’s logic board.
The Quick and Easy Fixes (The First Things to Try)
Don’t rush to a repair shop just yet. Many of the most common causes can be resolved in a few minutes at home. Start with these simple fixes, which address the most likely culprits.
1. The Headphone Plug Trick
This might sound overly simple, but it’s often the most effective first step.
- Find a pair of headphones (or earbuds) and plug them into your iPhone’s charging port or headphone jack.
- Make sure you push the plug in firmly until it clicks.
- With the headphones in, play some music or a video to confirm the sound is working.
- Now, unplug the headphones quickly and firmly. Do this a few times—plugging in and unplugging—to see if it dislodges any stubborn debris or resets the software.
2. Check and Clean the Port
This is the most critical step if the headphone plug trick didn’t work. A dirty port is the number one cause of this issue.
- Safety First: Turn off your iPhone before you begin.
- Inspect: Use a flashlight to look inside the lightning port or headphone jack. Do you see any lint, dust, or dirt packed inside?
- Clean with Care: Use a non-conductive tool to gently scrape out any debris. Never use anything metal. A wooden or plastic toothpick, a small brush (like a new, soft toothbrush), or a can of compressed air are your best options.
- Be Gentle: Avoid scraping the internal pins and be careful not to push the debris in further. Compressed air is great for this, but use short bursts from a distance to avoid damaging sensitive components. For more detailed instructions, you can refer to Apple’s official support page for cleaning your devices Apple Support – Clean your devices.
3. Restart Your iPhone
If the problem is a software glitch, a simple restart is often all it takes to clear the error.
- Force Restart: The method for a force restart varies by model.
- iPhone 8 and newer (including iPhone SE 2nd and 3rd gen): Press and quickly release the volume up button, then the volume down button, then press and hold the side button until you see the Apple logo.
- iPhone 7: Press and hold both the volume down and sleep/wake buttons at the same time until the Apple logo appears.
- iPhone 6s and older: Press and hold both the home button and the sleep/wake button until you see the Apple logo.
4. Adjust Volume and Audio Output Settings
Check your iPhone’s audio output settings to ensure it’s not locked to an external device.
- Open Control Center by swiping down from the top-right corner of your screen (or up from the bottom for older models).
- Look for the audio card in the top-right corner.
- Tap the AirPlay icon (a triangle with a few circles) and ensure that your iPhone is selected as the audio source, not a Bluetooth speaker, Apple TV, or another device.
Advanced Troubleshooting and System Checks
If the quick fixes don’t work, you’ll need to dig a little deeper. These steps address more persistent software issues and potential hardware problems.
1. Reset All Settings
A system-wide setting might be causing the issue. Resetting all settings can fix this without erasing any of your personal data.
- Go to Settings > General > Transfer or Reset iPhone > Reset > Reset All Settings.
- You will need to enter your passcode.
- This will reset all network settings, keyboard dictionary, home screen layout, location settings, and privacy settings to their factory defaults. Your apps, photos, and other data will remain untouched.
2. Check for Software Updates
An outdated operating system can sometimes lead to minor glitches.
- Go to Settings > General > Software Update.
- If a new version of iOS is available, install it. This can often fix known bugs and system issues.
3. Test for Hardware Damage
If none of the above has worked, the issue may be physical.
- Moisture Indicator: While it’s not visible in the port, every iPhone has a Liquid Contact Indicator (LCI) that turns red when exposed to water. You can find out where your LCI is located on Apple’s support site. While this won’t solve the problem, a tripped LCI is a strong indicator of water damage, which would likely require a professional repair.
- Physical Port Damage: Again, inspect the port carefully. A bent pin or a loose part can cause the problem. If you see any visible damage, do not attempt to fix it yourself, as you could cause further harm.
When to Seek Professional Help
If you’ve gone through all the troubleshooting steps and your iPhone is still stuck in headphone mode, it’s likely a hardware issue that requires a professional repair. Attempting to fix a damaged port or logic board on your own can lead to permanent damage and a much more expensive repair.
Why Choose a Professional Repair?
- Expertise and Tools: Reputable repair technicians have specialized tools to diagnose and fix hardware issues safely, such as micro-soldering equipment for board-level repairs.
- Quality Parts: They use high-quality, often OEM-grade, replacement parts to ensure the repair lasts.
- Warranty: Most professional repairs come with a warranty, giving you peace of mind.
At QuickFix, our certified technicians can quickly diagnose the problem, whether it’s a simple cleaning or a complex port replacement. We have the expertise to fix your iPhone and get you back up and running. If you’re ready to get a professional opinion, you can learn more about our services at Repair a Device.
Conclusion and Final Thoughts
An iPhone stuck in headphone mode is a nuisance, but it’s not a death sentence for your device. In most cases, a simple cleaning or a quick software reset is all that’s needed. However, if the issue persists, don’t hesitate to seek professional help. Your time and your phone’s health are valuable.
If you have any questions or are ready to get your phone fixed, don’t hesitate to reach out. You can find us at one of our many locations or contact us directly at contact us.
FAQs
Q1: Is it safe to use a cotton swab or needle to clean the port?
A1: No, this is highly discouraged. Cotton swabs can leave behind tiny fibers that can make the problem worse, and metal objects like needles or paperclips can easily scratch or short-circuit the sensitive pins inside the port, causing irreversible damage. Stick to non-conductive materials like a toothpick or a small plastic pick, or use compressed air.
Q2: What if my iPhone is still under warranty?
A2: If your iPhone is still under warranty and you suspect a hardware issue, it’s always best to contact Apple Support or visit an Apple Store. Attempting a DIY repair can void your warranty. You can check your warranty status and service options on Apple’s official website Apple – Check your Service and Support Coverage.
Q3: Can a software update cause this problem?
A3: While it’s rare, a buggy software update can sometimes introduce glitches that cause this issue. Usually, a subsequent minor update is released to fix such problems. If you’re on a recent update and experiencing the issue, a factory reset might be necessary, but this should only be done as a last resort.
Disclaimer: The information provided in this blog post is for educational and informational purposes only and should not be considered a substitute for professional technical advice. While these steps are generally safe, QuickFix is not liable for any damage that may occur to your device from attempting these fixes. If you are unsure or uncomfortable with any step, please consult a professional technician. For more information about our services, please visit our main page at QuickFixiPhone.com.